24 Nov 2012

Why I left microstock


For me, the camera is a sketch book, an instrument of intuition and spontaneity 
~ Henri Cartier-Bresson


I've recently pulled all of my images from a microstock site and a few people have asked me why. I hope this helps to explain my motivation behind my move.

Although I have only recently returned to drawing and painting as a way to express my creativity, I had, for the past three years, been learning about photography as an art form and trying to find ways to improve. I guess if you suppress your creativity in one area it will always find another way to come out. 
I had always thought that photography was going to be my creative outlet after I read a book about Robert Capa. It totally got me hooked on photography.

I bought my first 35 mm film camera in 1986, around the same time I gave up my painting, and a month later bought my first film SLR. I happily used these and captured many pleasing images, mostly on slide film until my first child was born in 1999, where I realized that it was getting really expensive to take so many pictures of my son and when money was especially tight one year I sold all my gear. A few months later I bought my first compact digital camera and used it for taking mostly family photos. 

Fast forward the next few years and several camera changes and in February 2009 I heard of microstock photography and bought a Canon Rebel digital SLR and uploaded a few shots. Most were rejected as non-stock worthy, hardly surprising as I hadn't researched what microstock agencies wanted before I uploaded. I laugh about it now but at the time it was rather soul crushing ;) I uploaded images for about a year before I realized that I'd totally lost my enthusiasm for photography. It had stopped being fun and started to become a rather boring chore, I'd even stopped taking my camera to family occasions which is a shame because I can never go back to take those missed family moments again. I stopped uploading then and did a lot of soul searching before I could decide what to do next. 

My problem? 
What I wanted to shoot wasn't what was selling well in microstock and what was selling well, I didn't want to shoot. I'm not into shooting models brushing their teeth etc or hammers and things isolated on white backgrounds. It's just not me and I'm guessing a lot of people out there feel the same. I think it comes down to this, I don't want to shoot an advertising shot to sell a product, I prefer my shot to be the end product, a piece of art I guess. I prefer the art side of the business to the commercial side and microstock is more on the commercial side so it wasn't for me. My art shots sold through the micros but not as well as they sold elsewhere as a finished product. 

Which brings me to my blog post here today.  I felt I had come to a crossroads and needed to make a final decision on which way to turn. One way would mean continuing as I am, creating images I want to using a mix of photography and painting and finding a market that appreciates them as they are or the other path which would mean investing in lighting and better equipment and sinking a lot of money into a direction I really didn't feel comfortable in. I chose the first one, I like to follow my own path through life I guess. The best part is that my 13 year old son also wants to join me on this path. We share a Zazzle store together. The polar bear fishing on the top left of the following image, and also the "Play hard" hippo on the bag 2nd from bottom on the right, are his creations. 


This is a link to our store http://www.zazzle.com/wildmacnz

I hope that you will be able to understand my reasons for leaving the micros and perhaps if you also feel that you have reached some sort of crossroads in your own work, this may give you the courage to try something new, to make your own path going forward because we all have our own unique gifts to share and should be able to share them in a way that makes sense to us.


Have a great week :)

31 Oct 2012

Serendipity


Sometimes the slightest things change the direction of our lives, the merest breath of a circumstance, a random moment that connects like a meteorite striking the earth. Lives have swiveled and changed direction on the strength of a chance remark - Bryce Courtenay


I can hardly believe that a whole month has passed since I last wrote a blog post here, it only seems like last week that I was making my mini watercolor painting kit. It seems I'm now on that fast slippery slide that leads to Christmas and all the fun and mayhem that creates. I've made some great discoveries and painted a lot of color test sheets and tried some new watercolor techniques too over the past month. By far though, the best thing that's happened artwise has been the lucky discovery of a great Facebook sketching group. 

Back in April I borrowed a fantastic book from my local library called "Artist's Journal Workshop" by Cathy Johnson. http://www.amazon.com/Artists-Journal-Workshop-Creating-Pictures/dp/1440308683 
This book changed my life and I'm going to buy my own copy as a Christmas present to myself. This book is what started me on my creative journey back to art after 26 years and what started me blogging here in the first place. This book really has changed my life and this past month I discovered that there was a Facebook group of the same name running.
It's full of friendly, encouraging, wonderful, inspiring people who I've learned so much from in such a short time. 

I've learned a lot about color, equipment, and technique but by far the most important lesson I've learned is that it's a long, lonely road when you walk it on your own but a wonderful fun filled trip when you have other like minded people to share it with.

 Up until now I haven't done anything about finding other people in my town that like sketching or painting and I've had trouble keeping up a routine of working in my journal. Having this online group to share with has been great, seeing other people's work has sparked ideas for drawings of my own and I find that I'm more inclined to draw if I'm going to be able to share it with someone when it's finished. I guess my next step now will be to try to find other people that live in my area that I can go on sketch trips with. Something that I would never have thought of doing before joining this group. 

My concept of what art is or can be and my enjoyment level has totally changed and so I thought I would share my found treasures with you so that you too can maybe find a reason to pick up a pencil and see the world through new eyes :)

The picture of Buddha is painted in non-permanent black gel pen and watercolor paint for the shrubs.

Have a great week :)


23 Sept 2012

Making a watercolor travel kit


Much ingenuity with a little money is vastly more profitable and amusing than much money without ingenuity - Arnold Bennett


Recently I've been pricing up watercolor travel kits and to be honest the ones I've seen here in New Zealand haven't been very cheap. The Winsor and Newton Cotman Sketchers Pocket Box is one set I've been looking at and the price is around the $56 NZ mark. Not very cheap if you are just starting out and have children that would like a set each too. This prompted me to start looking at cheaper alternatives.

I've seen a lot of different kits on the internet made from peppermint tins and using half pans mounted on small magnets to keep them from moving around inside. I priced up this option and buying half pans with paint already in them in the Cotman's range was going to be more expensive than just buying the travel kit. As I already have watercolors in tubes I thought that maybe buying empty half pan cases and filling them with my tube paint might work out cheaper. Unfortunately I haven't been able to find empty half pan cases yet so I decided I needed to put a bit more thought into it. 

What I really needed was a container with a lid and different compartments in it. I had a couple of different ideas. An ice cube tray, but I decided that it was too big, a pill type box with separate days, but I thought the plastic hinges wouldn't last, and finally an eyeshadow box, which is small and thin and has a proper hinge on it. Eureka!

So off to the $2 shop I went, looking for a cheap eyeshadow set that I could convert and they didn't disappoint me. The photo above is of one of the three sets I purchased, I spent $6 in total. The eyeshadows were in little metal containers fitted into the compartments with a tiny bit of glue on the bottom. I prised them out easily with a small screwdriver, you could also use a knife blade. The glue came out easily in a chunk just using my finger nail. Below is the case minus all the eyeshadows.


After I'd emptied the case and scraped off all the glue I gave the case a good wash out in dish washing detergent using a rough woven scouring type cloth pad, just to make sure that any remaining glue or eyeshadow was removed properly. Then I dried it all and added the paints from my tubes. See picture below.


I now need to leave the paints for a couple of days to dry out completely and I'll have a compact watercolor set I can fit in my pocket if I want to. Below is a picture of the container I keep my tubes in contrasted against the compact size of my new travel kit. I can use a much small bag now :)


The only other thing I will do to this kit when the paint is all dry is to paint the inside of the lid white to mix on.

 I'll still probably need to carry something else small to mix on and a water bottle. When I go for long walks especially in the summer time, I always carry a drink bottle with me anyway. While at the $2 shop I also picked up a small telescoping brush tube to keep my brushes in. I'd also like to try out the water brushes with the water tank built in at some stage, these could make my kit even smaller. 

I can't wait for the paint to dry so I can get out and test drive my new kit!

I hope this gives you ideas for your own travel kits. Have a great week! :)


28 Aug 2012

How do you work?


"The reason that art (writing, engaging, and all of it) is valuable is precisely why I can't tell you how to do it. If there were a map, there'd be no art, because art is the act of navigating without a map." - Seth Godin


Today I thought I would blog about how I get a sketch ready to paint. I'm always curious about other artist's workflows and I would love to hear how you work too. Feel free to leave a comment here.
I have two ways of working when I sketch.

If the sketch itself is the focus I tend to focus on the detail. I draw out my rough sketch first and then refine the shapes and add the details as I go. Shading and crosshatching to bring out the form. All the drawing is my own work with no shortcuts.

However;
            
If the painting is my main focus I only draw in an outline of the basic subject and paint in the detail as I go. If it is a landscape I may even just start straight into the painting and just roughly guess the scale as I paint. But if the painting is of something detailed that really needs to be in proportion I might even go as far as to trace an outline of the subject from my photograph just to get it done quicker because the sketch itself was never the focus of the work. (I'm even more likely to do this if I've already painted a small scale version and just want to quickly start on the full size piece. It's sheer laziness really but I drew it once already so why do I have to start from scratch again? I learned to work this way at school.)
I know this may sound like cheating and I guess it is in a way, but I know plenty of other painters that work this way. Some absolutely hate to draw or can't draw and the painting is the art for them. Some even project their image outline onto their canvas using projectors, or print it out and trace an outline onto the canvas that way instead. I can understand people working on huge over-sized pieces working with a projection, you'd spend a lot of time running backwards and forwards checking your scale and proportions otherwise. 

Below is an example of an outline that I would use to paint from. It's darker than I would usually draw it so that it would show up here. Just before I painted it I erased the pencil down to just a light marking, how I would usually have it marked out. The image above is of the finished bird.


As you can see it's just an outline of the bird's shape. A lot tidier than it would usually look because I darkened up the outline and you can't really see the other rough wobbly lines. I work on all the birds the same way regardless of colorings or markings on them. The details I just paint in as I go.

Something else I do is, when I'm working with watercolor paint I mix up all the colors I want to work with before I start to paint. When I'm working with acrylics I mix as I go.

So, how do you work when you're setting up a painting? Do you have any tips or shortcuts you would like to share here? I look forward to hearing from you.

Have a great week :)

6 Aug 2012

I've found the answer!


The important thing about a problem is not it's solution, but the strength we gain in finding the solution - Seneca

Last time I blogged I was testing out using acrylic paints as watercolors. I'd finished two paintings and although I felt that the finished product was okay I still had an irritating feeling about using acrylics this way. I decided to continue with the experiment to see if I could figure out what it was that I didn't like.

Today I painted three more bird pictures, shown here, using acrylics as watercolors and I think I've figured out what it was that I didn't like compared to real watercolors. It's the finished colors or perhaps more correctly their luminosity or lack of it. The watered down acrylics seem flatter and duller somehow even though the colors used are the same. I'm not talking about the finish, they are both a matt finish. It's more that the colors are somehow less luminous, they have less life in them than the watercolors do. 


Just to make sure that I'm not imagining it I'm going to paint the next couple of birds using the real watercolors and compare the results again. If I'm right I guess I'll have to stop being a scrooge and buy some more watercolor paints ;)

I've also just noticed that the shapes of the birds on the next page are showing through on these scans. One of the pitfalls of working in a book and not scanning each image as I finish it I guess. Note to self, put blank sheets of paper behind the images before I scan them or scan each image before I start the next one.


I'm not too happy with the owl anyway, it's having a bad hair day lol. I suppose that not everything is going to work out how I envision it and I'd better get used to it. On the plus side I discovered that peppy music gets me singing and working quite productively. I guess music and it's effect on my work is something else I should explore a bit more. Perhaps it may help me get in the mood when I really don't feel like painting.

Please let me know if you've discovered something similar with the luminosity of watercolors vs acrylics watered down.

Have a great week! :)


31 Jul 2012

Using acrylics as watercolors


Acrylic is the only painting medium that can be all mediums - it can act like watercolor, it can act like oils, and it has it's own innate properties - Andrew Hamilton

Recently I've been experimenting with using acrylic paints as watercolors mainly because I have lots of acrylic paint lying around and I haven't got much watercolor paint left. The results have been quite interesting.
I first tried mixing up a few test paints to see how well they would flow and whether the colors would change when they dried. The test was done on a scrap of watercolor paper and was just some rough markings and a few test patches to try blending the colors. The first paint I mixed up had bubbles in it which I didn't think much about until I actually painted the bubbles onto the paper and they dried as bubbly marks. That was unexpected and I'm not sure why there were bubbles at all, I guess acrylics need more mixing in the water than the watercolor paint and this causes the bubbles.
I found the acrylic paint stayed very vibrant when watered down and I didn't notice much of a color shift when they dried either.

For some reason though, and I can't put my finger on exactly why, I prefer using the watercolor paint.The two paintings done here were both done using watered down acrylics and I'm happy enough with the results, but I just have this niggling feeling that I would have made a better job using watercolor.


I've decided to keep using the acrylics for now though. I want to explore layering washes more and I'm hoping that whatever it is that I don't like about using the acrylics this way will become clearer with more practice.

On a positive note, I bought some .1 sized pens and I'm very happy with how fine they are compared to the .4 that I used on the Thrush and Kingfisher.

Have a great week! :)


16 Jul 2012

Watercolor experiment part 2


All art is but imitation of nature.
- Lucius Annaeus Seneca


Since yesterday's watercolor experiment worked out better than I'd hoped I decided to retry an earlier attempt at painting a kingfisher. The photo above is used with the permission of my Mum. Thanks Mum :)
The image below was painted the day I bought my first set of tube watercolor paints, on the 2nd of May this year. I didn't water them down enough and tried to use them like acrylics, rather unsuccessfully.


I wasn't very happy with the results from my first attempt but I figured it was a first attempt after all. So we learn and move on.


This was today's result without any pen detail. (above)
This is today's result after the pen detail was added. (below)


I still think the pen is way too thick, I'll have to buy a .1 or .2 pen sooner than I planned but I definitely think the second painting is a vast improvement on the first though I'm glad I took a scan copy before I added the ink. I forgot to do that on the thrush yesterday.

So what do you think?


15 Jul 2012

Experiments in watercolor part 1


All life is an experiment. The more experiments you make the better
 - Ralph Waldo Emerson


I've been in and out the last two weeks on holiday with hubby and the kids. We've had lots of fun but I'd have to say that my favorite day of the holidays was a trip we took to Tauranga and Mt Maunganui. Hubby and Master 13 wanted to check out model shops, they're working on a project together and needed supplies. Miss 7 just loves exploring and I really wanted to check out an art supply store I found online called "The Red Studio". It turned out to be a great store with a very helpful salesman that introduced me to my new favorite art journal. A Daler Rowney Ebony A6 hardcover sketchbook. 150gsm off white paper, delicious and not badly priced either. 

Today was the first day of the new school term so I took advantage of the peace and quiet to try out the new sketchbook. The picture above is the result. It's in watercolor and ink.

I'm still fairly new to watercolor, I usually paint in acrylic, so I thought I'd use this new sketchbook for my watercolor experiments. My old journal only has 100gsm paper and buckles quite badly when it gets wet. I'm happyish with the end results. The paper stayed flat and was lovely to paint on. But it's going to take me a while to get used to working with watercolor paints though. They flow very freely in places I don't want them to at the moment lol. Still, I'm okay with the look of this painting but I think the pen work is too thick though for the size of the image. So I'm going to have to invest in some different sized pens, a .1 or .2 would have been better than the .4 that I used. I'd even have preferred a dark brown pen to the black but I have no idea if I can get different colors. That's something else I need to explore. Overall though I'm quite happy, I broke the first page jitters without too much hassle even though halfway through I wished I was painting a penguin or something easier instead. All up I think I spent about 45 minutes to 1 hour total on it. So it was a pretty quick job.
I'm really looking forward to filling this little book with more watercolor experiments and if they work out okay I think I'll invest in some better quality paints too to see what difference that will make. 

So what did I learn?
  1. Practice, practice, practice. I need to build up my experience using watercolor paints. There are lots of tutorials on youtube to help with learning the different techniques so I have no excuse not to try.
  2. The type and quality of the paper makes a huge difference! I need to use the right materials to do the job well.
  3. Small images require finer tipped pens to really make a positive difference.
  4. Shopping in new art supply stores is lots of fun! :)

Have a great week everyone!  :)

24 Jun 2012

Letting your inner child out to play


"I like nonsense, it wakes up the brain cells. Fantasy is a necessary ingredient in living, It's a way of looking at life through the wrong end of a telescope. Which is what I do, And that enables you to laugh at life's realities."
Dr Seuss

I haven't posted here for a couple of weeks. I kind of lost track of time and I'm not sure where the time went. I guess most of it disappeared into family stuff, school visits, etc. Next week will be the first week of a two week school holiday for the kids, between terms, so I thought I'd better post something now while I've got some peace. It can be quite funny proofreading something I've written while I was also talking to the kids about something else but it doubles the work really :)

For the past two weeks I've been reading through a few mixed media and drawing books from my local library, taking notes and trying out some of the exercises. Quite formal exercises. Today I was going to do the same thing but I just couldn't get into it. I wanted to paint something more fun and less lesson like instead. Luckily I borrowed an excellent book called "Drawing Lab for mixed media artists" by Carla Sonheim with the other books. It's a great little book filled with quick exercises to get your creative juices flowing. I'd spotted a fun sounding exercise in it and today seemed like the right time to give it a try. This is a link to the book.

The exercise was to help release your inner Dr Seuss. The idea is to flick through a few of his books to get a feel for his style and then draw something of your own in that sort of style. It was a lot of fun and I drew a few houses in our street. My house is the pink one with the dangerous looking stairs (I broke my foot on them back in February this year). My neighbor's house is the blue one down the hill and so on. The spiky trees are our cabbage trees that grow here in New Zealand. I totally had fun with this and was feeling pretty happy with it when my son walked in from school and said "Dr Seuss, mmm looks good" and my daughter agreed. I started to have second thoughts though when my husband walked through and asked if it was from SpongeBob Squarepants. You can't please everyone I guess :)

I've decided to draw more of this type of image when I'm feeling tired of the normal work, to relax and have fun and perhaps I'll develop my own style in time.  I've also been toying with the idea of creating a little story using fingerprint characters. Miss 7 would love that too :)


10 Jun 2012

Autumn Collage Fun


Autumn Leaves

Golden and red,
spinning,whirling, dancing
in circles to the music of the wind.
The trees shake off their autumn coat
to dance naked in the winter chill.
The ephemeral mists silkily
caressing their limbs,
before abandoning them to
sway in gentle rhythm
to Mother Natures music.
- Carolyne MacMillan (me)


About two weeks ago Miss 7 and I collected lots of autumn leaves from our garden and pressed them for a week. The Liquid Amber leaves were particularly lovely shades of pink and red. Yesterday we decided to collage with some of them. Miss 7 also used some of the other paper collage items we had lying around. I also found a packet of skeleton leaves I didn't remember we had and we started to create. The images were to represent our vision of Autumn. 

It turned out to be an interesting exercise in patience for Miss 7 who had trouble with everything sticking to her fingers and not to the paper. Dried leaves are very fragile and for a while I thought she might give up but after a lot of effort though she got everything where she wanted it and started drawing with felt pen within her collage. In the end she decided that it needed to dry out before she could do any more and we packed up for the afternoon. I was pleased when she asked could we do this again next weekend, I wasn't sure she had enjoyed this exercise as much as some of the others we have shared. So hopefully she will finish her collage next weekend and I can add a picture here.

Autumn is my favorite time of year. I love the colors all pinks, reds, oranges and shades of brown and the misty cool mornings. I think it's the best season for early morning walks with my camera. Winter is a close second for me though. We don't get snow here but crunching through icy grass on a cold morning is fun and I love the stark tree shapes half hidden in the mist. It's a great time to be alive.
You can keep my Spring though, too rainy and it spoils the flowers and Summer is just too hot to bother with really. 


The photo above was taken by me back in 2009. It's taken on a walkway around one of our local lakes and our families favorite place to go for walks. I never have to ask twice if anyone wants to go for a walk around the lake :) 

My collage is a mixture of acrylic paint and leaves.

24 May 2012

Overcoming Mental Blocks


 Failure is, in a sense, the highway to success.  - John Keats


I've had an up and down sort of week this week. I've had lots of ideas for drawings and paintings but when it's come time to start them I've stalled. Each time I've lifted my pen a voice in my head has told me "that's a stupid idea for an image" or "you can't draw that it's too hard". I'd developed stage-fright since I discovered that some people are actually reading my blog, shock, horror, giggle.
Luckily I have a lot of very creative friends and I sent out a call for help dealing with mental blocks and guess what? Before anyone had even answered I was back drawing in my journal. I used the idea of a mental block as a way to kick start my creativity again and it worked! So after I'd worked that out of my system I went back to an idea I had earlier in the week, "what would make my home appliances perfect?" The image below is the result.


What a time saver this would be in the mornings, especially on school days! 

I'm not sure if my mental block will stay away but it's gone for now and I have a strategy for dealing with it if it happens again. Use the problem as a solution by creating an image about the problem and hopefully that will be enough to move through the block. :)

These two images were created using different colored pens and watercolor paints.


18 May 2012

The child and the messy room


"Cleaning your house while your kids are still growing is like shoveling the sidewalk before it stops snowing" - Phyllis Diller


I don't know whether it's my daughter's age, she's seven, or just the way she naturally works, but my daughter's room always looks like a tornado passed through it. My son is now thirteen and I don't remember him being that messy at seven but who knows maybe my memory is going.
Anyway today we had the "you need to clean up your room or I'll go through it with a rubbish bag" talk. Miss seven whined a bit and said it was too hard to do on her own but I told her she was getting older now and that I trusted her judgement on what she wanted to keep and what should go out. So Miss seven went into her room and started to tidy up. I checked on her after five minutes and things did seem to be improving so I made the mistake of wandering off to do something else and promptly forgot all about the mess. After about an hour Miss seven proudly came through to tell me she had finished tidying and could she do something else now. Feeling very pleased with her maturity I followed her through to see what she had done.
Well, what can I say?
The room looked worse, if that's possible, than it had when she had started! Instead of going through all her artwork that was scattered all over the room and floor she had created new drawings and pulled out boxes of toys to hide them all behind and under. It was really hard not to laugh at her ingenuity.
Anyway she won and I helped her go through her artwork, storing the good pieces safely and binning the rest. We also went through the toys and sorted out some she had grown out of to donate. On the plus side we had lots of fun and even found three pairs of socks and some other clothes she thought she had lost.


This week I've been learning to draw human body parts. Realistic and cartoon hands and eyes. Hands are difficult and I need much more practice. I like the expressions you can get with just eyes though. Today's sketch is just eye expressions made with a black pen.

13 May 2012

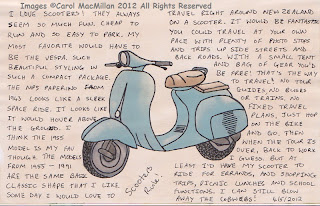
I love scooters!


Life should not be a journey to the grave with the intention of arriving safely in a pretty and well preserved body, but rather to skid in broadside, in a cloud of smoke, thoroughly used up, totally worn out, and loudly proclaiming, "Wow! What a ride!" - Hunter S. Thompson


I am in love with scooters, scooter mad some might say. I'm always looking at them in magazines and books. I can never walk past one without stopping for a look. Even my favorite t-shirt has a Vespa on it and now I've started drawing them too. I guess I just need to get this scooter craze out of my system.
Years ago I owned a motorcycle, a Kawasaki 250cc. It was the first bike I owned and I loved the freedom I felt on it. A car has just never appealed to me in the same way. My brother-in-law had a scooter at around the same time and we started swapping rides some times. I loved it and actually preferred the scooter to the motorcycle. In the end I sold my bike to fund a trip round the South Island (New Zealand) with my husband. My parents were living down there at the time. Then time moved on, I had children and scooters and bikes seemed impractical and any thoughts of owning one again were pushed out of my mind, until recently.
I'm not sure when the thoughts about scooters started again but I've started thinking about touring around New Zealand on one. Who knows maybe one day once the kids are older they might join me :)

I thought I'd try tea staining the paper for this one. I wanted a more retro feel to go with the age of the scooter. I'm quite pleased with the results. A friend of mine uses coffee to stain the paper so I might give that a go next and see whether there's much difference in the finish. The bike is in pen and watercolor.

12 May 2012

A Piggy Tale


"Take care of the pence, and the pounds will take care of themselves" - William Lowndes


Wow what a week!
A sick child at home with a tummy bug and then an allergic reaction caused by the same illness and also Hubby home with a swollen infected leg. As you can imagine life has been a little busy and distracting so I've only managed one journal entry this week. 
It's that time of the year again when the IRD send you strange nonsensical letters about your taxes just to scare you before they tell you they made a mistake and they owe you money, fingers crossed anyway :D 
It's also council rates time grrr, so not really my favorite month.
Anyway I spotted our terracotta piggy bank high up on a shelf in the kitchen and thought "mmm I wonder if there's anything in there?". 
Short answer "No".
This got me to thinking about how many other empty piggy banks could be languishing in the back of people's cupboards and shelves around the world in this time of global financial unrest. Could the cute little piggy bank soon become nothing more than an empty ornament as governments gradually drop small value coins as prices go up or as we eftpos everything and therefore never handle money? Could our children end up with nothing to jingle in their little piggies?
What a horrible thought....

While working on this with some new black pens I discovered that they weren't as permanent as I thought they were. I suppose I should learn to test these sorts of things out before I start a drawing? Anyway this opened up a whole different way of shading as I just added water with a brush to see what they would do. Then I just finished with some burnt sienna watercolor paint and a brown colored pencil.
I also discovered something weird, when I started trying to draw this pig with pencil I just couldn't get it right. I erased bits here and there, redrew the pig twice and in the end chucked the pencil and picked up a pen. It came out pretty much how I wanted it straight away. No erasing, no second chances. It's like my brain said "Right, this is it, no chance to fix anything so get it right!" And it worked! The scooter from the next post was drawn straight off with a pen too. I think I might just lose the pencil for a while and see how things go ;)


5 May 2012

Why is everything brown?


"I advise students on the subject of color as follows: If it looks good enough to eat, use it." - Abe Ajay


I had a very fun day today helping my seven year old daughter learn about colors. It all started with a simple enough question, "Why is every color I make brown?".
 "Brown?" I asked, "What do you mean every color is brown?"
 "Well," she said, "everytime I try to make a color it comes out a different brown"
 "Sounds like we need a lesson on mixing colors" I said.
 "Humph" grunted my teenage son, "I know all that already". So he wandered off to his dark pit and left us in peace. :D
So the two of us happily spent our time making two color wheels, one to hang on the wall above the painting area and one in my journal just in case the wall one goes missing. Of course it would have been easier to just buy other colors of paint but I think a valuable lesson would have been missed and time spent together having fun is always worth the effort don't you think?

Go confidently in the direction of your dreams


"Go confidently in the direction of your dreams! Live the life you've imagined. As you simplify your life, the laws of the universe will be simpler"  Henry David Thoreau


This blog represents a lot of firsts for me. I've never kept an artists journal before, in fact until a couple of weeks ago I hadn't drawn or painted anything in 26 years. So in some ways everything feels completely new and exciting and in others completely scary and overwhelming.
So it only seems appropriate that my first journal entry represents that fear. The fear of failing in art, in failing at blogging of finding that maybe inside I don't have anything worth sharing is huge right now. I guess at some time or another we all stand at the edge of the abyss and have to decide whether to jump and hopefully soar or whether to turn away and not try. 
This blog will share my journey, my successes and failures. Hopefully it will at least be interesting maybe even funny and if I learn anything that can help any other newbie artists not to make my mistakes, I'll be sure to share.
So here goes, fingers crossed ;)